Showing posts with label fascinator. Show all posts

Monday, 20 April 2015

New Millinery Makes!

Hello all!

I hope you are all well and are enjoying the sun which is just starting to some out! :p

The week just gone was 'Symposium week' at my university (I posted about symposium last year, but for those who don't know it's kind of like a mini festival that happens on campus where there are workshops for you to sign up to and shows to watch!  So basically a week of fun and excitement exploring new things really :)

I actually hosted my own workshop this year teaching people the basics of knitting which was very enjoyable- everyone picked it up pretty quickly as well too which was impressive! They seemed to enjoy my class so I was happy :p I will definitely be trying to think of what workshop I can host next year now after the fun I had hosting my own!

Haha but now- among many one workshop I did was making theatrical (basically showgirl) headresss!!! The lady who taught the class was the one who teaches the week of millinery as part of my course- she is very talented and very lovely so it was nice to be taught by her again.

We learnt how to have the wire headband and base and then how to build up all the decoration on top. It was cool as everyone's came out so different.  Here is my creation....


Hehe I am quite proud of it. It is very fun to wear I must say! But I was also super happy to learn the skills of making the wire headband shape as I had caught the millinery bug again and being able to make my own wire headband base allowed me to experiment and come up with my own new fascinator design.....


I made it as a gift for the birthday of someone special to me's sister that is coming up soon :)

I quite like the design- it is kind of flower and origami like- it was fun to see what I could create by just folding and pleating and sewing the sinamay in different ways. And then I added the feathers and metal flat back charms to decorate :)

Hehe that's way out it for this fascinator and feather filled post :p

Talk to you all again soon! 

Byeee and thank you for visiting :) xxxx

Wednesday, 18 February 2015

Fascinator tutorial- Final part 3!

Hello everyone,

Once again sorry for the long delay between the parts of this tutorial! But here is the final part at last :)

So lets pick up where we left off then shall we? The last step covered was making up your lining, so now we can move on to sewing that inside your fascinator!

You want the right side fabric out of course- then place your lining inside your fascinator, making sure you line up the seams (of the darts) of the outer fabric of your hat and your lining- for a really neat and professional finish. Then pin up your seam allowance of your lining so you get a clean edge all the way around and slip stitch (invisibly) your lining in place all the way around the edge of your fascinator.

Hopefully that was easy to follow but here are some pictures as usual to help :):

Here you can see I have slipstitched almost all the way round and can see how the lining sits nice and smoothly inside :)
 
Here is a close up so you can see how the seam allowances tuck inside the fascinator and you get a nice clean edge:

 
And as it was really hard to try and photograph the stages of slip stitch for those who don't know I found the following tutorial which shows how to work invisible slipstitch really clearly :):
 
Then the final part of your fascinator- yes you are almost done, keep going! :) Is to add a way to fasten it to your head/hair.
 
There are many ways this can be done- by sewing in a comb (you can get these on eBay etc..), or a length on elastic (either end attached to either side of the fascinator)- the elastic should be long enough to securely hold the hat in place and stretch underneath your hair running against the back nape of your neck.
 
But one more method is to sew hair loops onto your fascinator, which you can then put hair pins through and into your hair to hold your hat down instead :)
 
This is really simple and just involves making a small length of chain stitch and sewing this into a loop. Repeat this in a few places around the brim of your fascinator (I just worked a loop either side :)
 
Here is a tutorial which explains chain/loop stitch well (the beeswax is optional though :): https://www.youtube.com/watch?v=4n6hhZNinSM

 
And now you can be super proud of yourself as your fascinator is all done!!!

 
Get out to a fancy party/event and show of your creation right away! :-P
 
Well done! :)
 
I hope you enjoyed the tutorial and if you have followed it I hope you like your finished fascinator!
 
Again if you have any questions or don't quite get any sections don't hesitate to leave a comment in the box below and  I will reply and try to be as helpful as possible xxx
 
I hope you are all well and thank you for sticking with me despite the long delays recently :P
 
Speak again soon,
 
Bye XxXxXxXxX


Monday, 2 February 2015

Fascinator Tutorial- Part 2

Hi everyone,

Today I return with part 2 of the fascinator tutorial! (see previous post for part 1 :) Overall there will be three parts so watch out for the last post in this series coming soon after today!

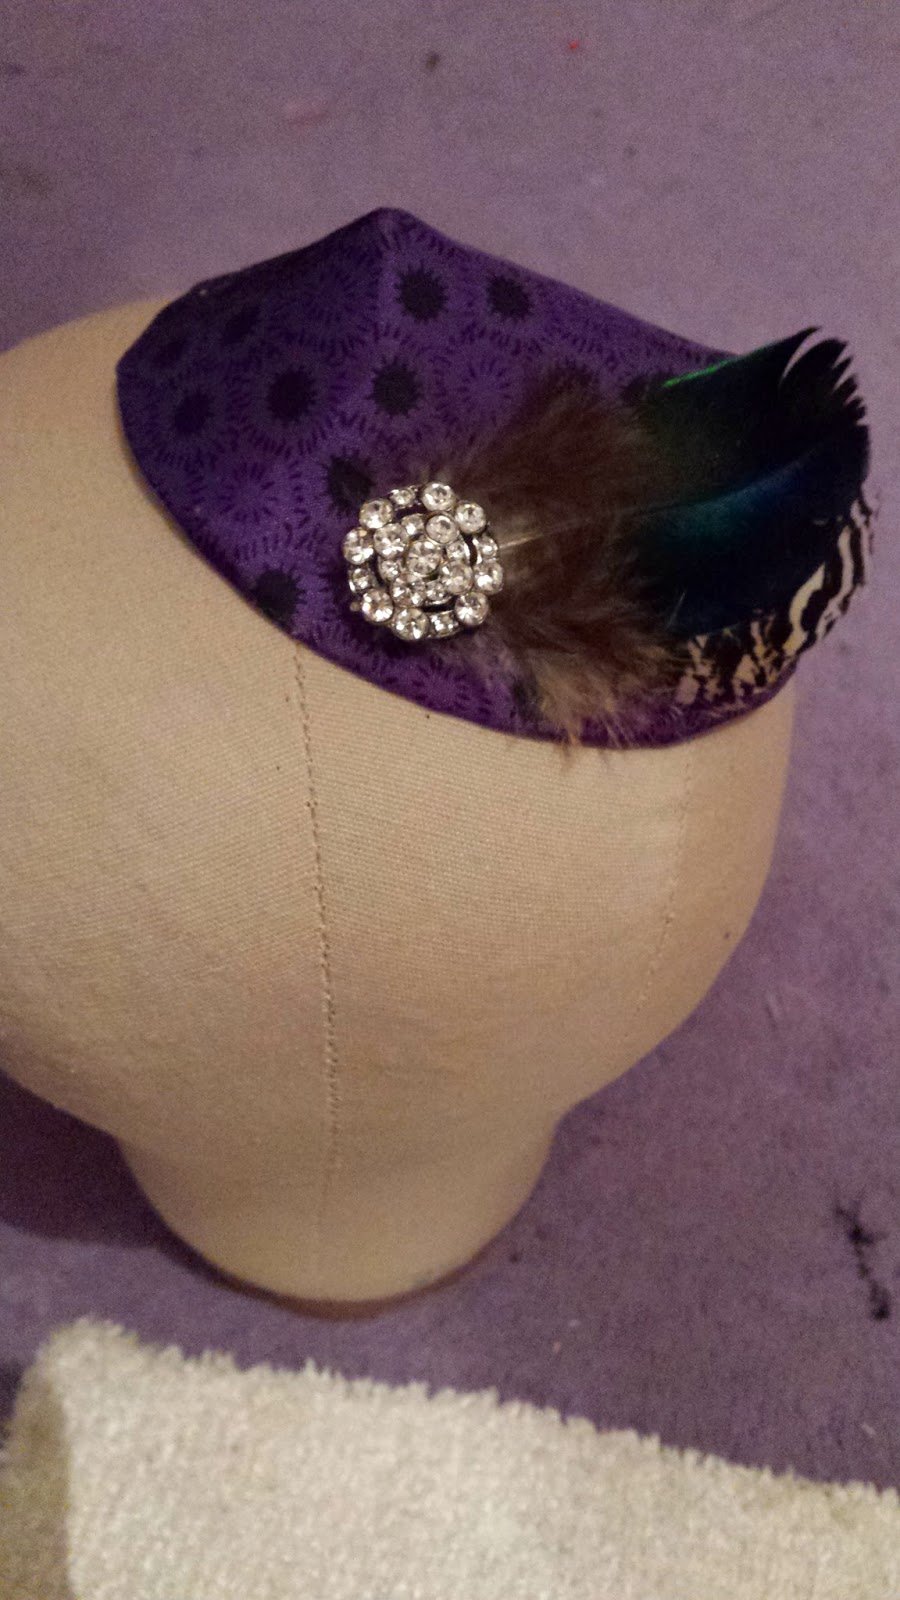
Now the last part ended with coating your hat base in fabric, so the next stage which we will start today with is adding decoration to your hat :) This is one of the funnest parts for many people- and there really aren't many rules so be as crazy and wild and creative as you wish! My decoration was made from a couple of small peacock/peahen feathers and a little brooch I have had in my random finds box for a while :P But you can use lace, beads, other types of feathers, bits of old jewellery- anything you want really.
 
as I said there are fairly few rules- You can attach your decoration by sewing it on (go through both the buckram and outer fabric) or gluing it on- whatever seems most appropriate. Generally go for sewing feathers on and if their spines are wide enough sew through the spines to hold them down really securely :)
 
So play around- see what works well and then fasten it in place:


Once you have fully beautified your hat you can then move onto cutting out your lining.
So choose your lining fabric and then find your base hat pattern again, and in the same way you did for your outer hat fabric cut around your template- adding an extra 1.5cm seam allowance around the edge and again not cutting out the darts- just mark them with tailor tacks or chalk again:

 
Then sew up the darts in your lining:

 
Once again, and as you did for your outer hat fabric, press the darts towards the back.
 
And we will stop there for today! But just to check you should have your main hat base coated in fabric and decorated and your lining all made up :)
 
Next time we will cover sewing in your lining, adding hair loops, or a comb or elastic to allow you to wear you hat! and possibly some other random bits and bobs too!
 
See you again soon with all that!
 
Bye XxXxX
 

Wednesday, 28 January 2015

Fascinator Tutorial-Part 1!

Hello everyone,
 
As promised I am back today with part one of my fascinator tutorial! :)
 
I gave you a nseak peak yesterday but here it is again, this is the fascinator shape/type Ill be working through with you:
 
 
This is a fascinator which has a buckram (a type of stiffened woven fabric) base though many fascinators are made completely from sinamay (the more traditional light more loosely woven stiffened fabric).
 
So here are a list of materials you will need:
 
- Some card or paper
- A pen/pencil
- A few pins
- Scissors
- A ruler
- Some buckram or other stiffened fabric for your hat base
- Some fabric of your choice for coating and lining your hat
- A length of millinery wire (or craft/DIY may suit the purpose- you can experiment with whatever you have :)
- Thread and a needle (some beeswax to pull your thread through is optional)
- Uhu glue , Copydex glue or Bostik multipurpose craft glue. All will do the job :P
- Some decoration of your choice e.g. feathers, brooches etc.
 
And now here is how to begin:
 
1. First it is good to draft up/drape your hat pattern in paper first. This shape of hat starts with an oval, which two darts are then taken out of, one either end, to create the final shape. You can go with any size oval you like but here is the piece I cut out with the dimensions written on it so you can follow this exactly if you wish, or draft up something similar:
 
 
2. Make sure you have cut up into the 5cm at either end as these are the places you will now be overlapping to work out the size of the darts you want to create your shape:


3. Try pinning and overlapping by different amounts until you are happy with the shape- but make sure the darts are both the same size (and that the overlaps run the same- towards the back) otherwise your hat could look lopsided :P There is no set measurement for the size of the darts- just whatever you think creates a nice shape! (I found 2cm worked well for me :).
 
4. But whatever works well make sure to take a pencil and mark where your overlaps run until so that when you undo your pattern, you will see the two pencil lines and can add 1.5cm seam allowance- the seam allowance tapers to nothing at the point of the dart though. If this sounds confusing hopefully the following picture of the final hat pattern will clear it up for you :):

 
5. Use your finalised pattern (above) to cut out your buckram base for your hat:

 
6. You can the take this piece and overlap the darts (by the 1.5 cm seam allowance) and the oversew them down using your needle and thread:

 
7. Next cut a length of millinery wire long enough to go around the base of your fascinator plus a few cm overlap.

 
8.  Then sew your wire just on the inside of your base using a blanket stitch. When you get back round to where the wire overlaps lay one end just under the other and work your blanket stitches closer together to hold the ends of the wire in place securely.

 
9. Your hat base should then look like this:

 
10. Next cut your outer fabric- you do this using the same pattern as you did for your hat base- but add 1.5cm all the way around it as seam allowance and don't cut out the sections for the darts!!! Just use tailors tacks or chalk etc.. to mark the ends and point of the darts so you know where to sew the darts!:


11. sew in the darts- on the wrong side of your fabric of course and then press them towards the back:

 
12. Then take your hat base and snugly fit your outer hat fabric covering over the top. It may seem a bit awkward or like it won't go at times but I assure you it will- you want a nice smooth snug fit- not bagginess! :P
 
13. Then take your Uhu (or other glue) and stick down your 1.5cm seam allowance all the way around the inside of your hat. Then leave it for a short while to dry of course :)


That is it for the first half of the tutorial but I will return shortly with the other half which covers decorating you hat and adding a lining and hair loops.... see you soon!
 
Bye xXxXx
 
P.s. if you have any questions about any of the materials, stages or things that seem unclear I will be happy to answer or try to explain as best as I can :)
 
Bye xxx


Tuesday, 27 January 2015

Fascinator post update...

Hello everyone,

Just to say the first half of my fascinator tutorial I have been teasing you all with is coming tomorrow evening!
 
Here is a sneaky peak of what ill be showing you how to make- but you can of course experiment with your own colours and decoration:

 
See you all verrry soon!
 
I hope you are all safe and well :) xxx
 
Bye xxx

Monday, 12 January 2015

More hattery :)

Hello everyone,
 
I hope your first few weeks of 2015 have been as fun and amazing as you wish the year to continue :)
 
I am now back at college, so back to more a bit more (mostly enjoyable :P) hecticness. Which Is why I was glad I made some more progress on my blue Hat I started on new years- before I had to hit the books again :P
 
I managed to get the lace pieces sewn on that I chose as my decoration:


You may recognise the lace motifs... they are from one of the dresses I picked up from the costume store sale a while ago :P I really like the pattern of the lace and have found so many things so far that it compliments, including the blue velvety fabric of this hat (which is actually from a spare curtain :P).
 
I also managed to squeeze in the time to make this little fascinator of my own design:


The main fabric coating this fascinator was another of my costume store bargains- they have all come in so useful! The leopard print fabric was from a shirt I didn't really need any more and I got the little metal charms when I was in the IOW one time. It was fun designing my first fascinator- From materials and a shape which seemed quite crazy it came out with the sophisticated but quirky factor I was aiming for I think :P I am happy... now I just need an event to wear it to! Haha :-)
 
Speak to you all again soon,
 
Bye XxXxX

Saturday, 15 November 2014

Millinery meanderings

Hi everyone,

At college at the moment we are on our carousel of different costume techniques that don't feature as part of the day to day of our course :) We get to do one week of millinery, dance ear , dying and breaking down and also a week of wig dressing. 

The week of millinery has just gone and it was such an interesting and enjoyable week. As some of you may remember I did a millinery course at the London college of fashion last summer. That course mainly focused on blocking techniques, whereas the week just gone at college we looked at cutting and shaping buckram to make hats- something much more achieve able at home without too much special equipment. I was so pleased with the result. We had to focus on the period of the 19th century to base out hat designs on. Here is the reference image I chose as a starting point for my hat, I found it in a book in the library: 


I didn't make my hat from straw however as I wanted to try fabric covering it so I went with a kind of golden straw coloured velvet instead.
Here is my final hat, I was really proud of it. Everyone else's was amazing too- it was amazing to see all thst had been produced in just a week!:


It is pretty big- you would need a lot if hairpins through the loops I sewed in to hold it down!

As this post was millinery themed, I thought it would be a good time to show you the fascinator I was making outside college that I just finished :-) It was from a kit from Hats on Heads (a millinery company- I bought two more of their kits from create and craft as well). It was pretty fun to make and not too much of it was given to you pre - done so I did actually lean quite a few skills.  Here it is:


Now I just need an occasion to wear it to! :p

Hehe,  I better be off to bed now, I hope you enjoyed my millinery meanderings.  Please do leave any comments below or ask any questions if you have them xxxx

Also don't forget tommorow the advent calendar giveaway ends do if you have entered already go do so now before it is too late! Good luck :-)

Speak to you all soon, 

Bye xoxoxo