Showing posts with label tutorial. Show all posts

Wednesday, 18 February 2015

Fascinator tutorial- Final part 3!

Hello everyone,

Once again sorry for the long delay between the parts of this tutorial! But here is the final part at last :)

So lets pick up where we left off then shall we? The last step covered was making up your lining, so now we can move on to sewing that inside your fascinator!

You want the right side fabric out of course- then place your lining inside your fascinator, making sure you line up the seams (of the darts) of the outer fabric of your hat and your lining- for a really neat and professional finish. Then pin up your seam allowance of your lining so you get a clean edge all the way around and slip stitch (invisibly) your lining in place all the way around the edge of your fascinator.

Hopefully that was easy to follow but here are some pictures as usual to help :):

Here you can see I have slipstitched almost all the way round and can see how the lining sits nice and smoothly inside :)
 
Here is a close up so you can see how the seam allowances tuck inside the fascinator and you get a nice clean edge:

 
And as it was really hard to try and photograph the stages of slip stitch for those who don't know I found the following tutorial which shows how to work invisible slipstitch really clearly :):
 
Then the final part of your fascinator- yes you are almost done, keep going! :) Is to add a way to fasten it to your head/hair.
 
There are many ways this can be done- by sewing in a comb (you can get these on eBay etc..), or a length on elastic (either end attached to either side of the fascinator)- the elastic should be long enough to securely hold the hat in place and stretch underneath your hair running against the back nape of your neck.
 
But one more method is to sew hair loops onto your fascinator, which you can then put hair pins through and into your hair to hold your hat down instead :)
 
This is really simple and just involves making a small length of chain stitch and sewing this into a loop. Repeat this in a few places around the brim of your fascinator (I just worked a loop either side :)
 
Here is a tutorial which explains chain/loop stitch well (the beeswax is optional though :): https://www.youtube.com/watch?v=4n6hhZNinSM

 
And now you can be super proud of yourself as your fascinator is all done!!!

 
Get out to a fancy party/event and show of your creation right away! :-P
 
Well done! :)
 
I hope you enjoyed the tutorial and if you have followed it I hope you like your finished fascinator!
 
Again if you have any questions or don't quite get any sections don't hesitate to leave a comment in the box below and  I will reply and try to be as helpful as possible xxx
 
I hope you are all well and thank you for sticking with me despite the long delays recently :P
 
Speak again soon,
 
Bye XxXxXxXxX


Monday, 2 February 2015

Fascinator Tutorial- Part 2

Hi everyone,

Today I return with part 2 of the fascinator tutorial! (see previous post for part 1 :) Overall there will be three parts so watch out for the last post in this series coming soon after today!

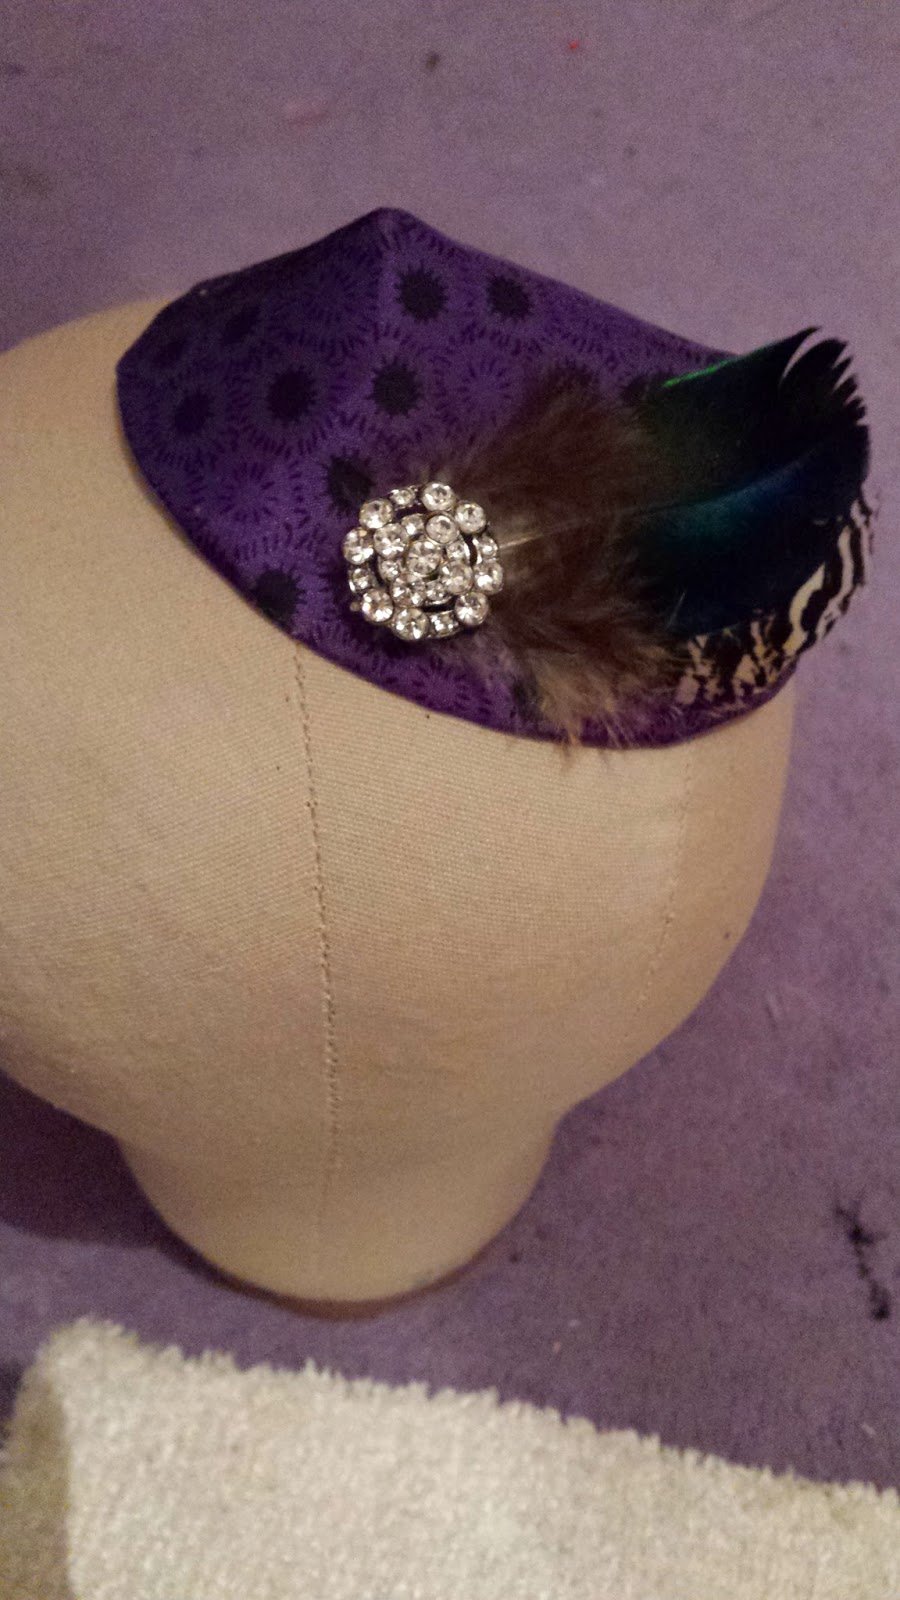
Now the last part ended with coating your hat base in fabric, so the next stage which we will start today with is adding decoration to your hat :) This is one of the funnest parts for many people- and there really aren't many rules so be as crazy and wild and creative as you wish! My decoration was made from a couple of small peacock/peahen feathers and a little brooch I have had in my random finds box for a while :P But you can use lace, beads, other types of feathers, bits of old jewellery- anything you want really.
 
as I said there are fairly few rules- You can attach your decoration by sewing it on (go through both the buckram and outer fabric) or gluing it on- whatever seems most appropriate. Generally go for sewing feathers on and if their spines are wide enough sew through the spines to hold them down really securely :)
 
So play around- see what works well and then fasten it in place:


Once you have fully beautified your hat you can then move onto cutting out your lining.
So choose your lining fabric and then find your base hat pattern again, and in the same way you did for your outer hat fabric cut around your template- adding an extra 1.5cm seam allowance around the edge and again not cutting out the darts- just mark them with tailor tacks or chalk again:

 
Then sew up the darts in your lining:

 
Once again, and as you did for your outer hat fabric, press the darts towards the back.
 
And we will stop there for today! But just to check you should have your main hat base coated in fabric and decorated and your lining all made up :)
 
Next time we will cover sewing in your lining, adding hair loops, or a comb or elastic to allow you to wear you hat! and possibly some other random bits and bobs too!
 
See you again soon with all that!
 
Bye XxXxX
 

Wednesday, 28 January 2015

Fascinator Tutorial-Part 1!

Hello everyone,
 
As promised I am back today with part one of my fascinator tutorial! :)
 
I gave you a nseak peak yesterday but here it is again, this is the fascinator shape/type Ill be working through with you:
 
 
This is a fascinator which has a buckram (a type of stiffened woven fabric) base though many fascinators are made completely from sinamay (the more traditional light more loosely woven stiffened fabric).
 
So here are a list of materials you will need:
 
- Some card or paper
- A pen/pencil
- A few pins
- Scissors
- A ruler
- Some buckram or other stiffened fabric for your hat base
- Some fabric of your choice for coating and lining your hat
- A length of millinery wire (or craft/DIY may suit the purpose- you can experiment with whatever you have :)
- Thread and a needle (some beeswax to pull your thread through is optional)
- Uhu glue , Copydex glue or Bostik multipurpose craft glue. All will do the job :P
- Some decoration of your choice e.g. feathers, brooches etc.
 
And now here is how to begin:
 
1. First it is good to draft up/drape your hat pattern in paper first. This shape of hat starts with an oval, which two darts are then taken out of, one either end, to create the final shape. You can go with any size oval you like but here is the piece I cut out with the dimensions written on it so you can follow this exactly if you wish, or draft up something similar:
 
 
2. Make sure you have cut up into the 5cm at either end as these are the places you will now be overlapping to work out the size of the darts you want to create your shape:


3. Try pinning and overlapping by different amounts until you are happy with the shape- but make sure the darts are both the same size (and that the overlaps run the same- towards the back) otherwise your hat could look lopsided :P There is no set measurement for the size of the darts- just whatever you think creates a nice shape! (I found 2cm worked well for me :).
 
4. But whatever works well make sure to take a pencil and mark where your overlaps run until so that when you undo your pattern, you will see the two pencil lines and can add 1.5cm seam allowance- the seam allowance tapers to nothing at the point of the dart though. If this sounds confusing hopefully the following picture of the final hat pattern will clear it up for you :):

 
5. Use your finalised pattern (above) to cut out your buckram base for your hat:

 
6. You can the take this piece and overlap the darts (by the 1.5 cm seam allowance) and the oversew them down using your needle and thread:

 
7. Next cut a length of millinery wire long enough to go around the base of your fascinator plus a few cm overlap.

 
8.  Then sew your wire just on the inside of your base using a blanket stitch. When you get back round to where the wire overlaps lay one end just under the other and work your blanket stitches closer together to hold the ends of the wire in place securely.

 
9. Your hat base should then look like this:

 
10. Next cut your outer fabric- you do this using the same pattern as you did for your hat base- but add 1.5cm all the way around it as seam allowance and don't cut out the sections for the darts!!! Just use tailors tacks or chalk etc.. to mark the ends and point of the darts so you know where to sew the darts!:


11. sew in the darts- on the wrong side of your fabric of course and then press them towards the back:

 
12. Then take your hat base and snugly fit your outer hat fabric covering over the top. It may seem a bit awkward or like it won't go at times but I assure you it will- you want a nice smooth snug fit- not bagginess! :P
 
13. Then take your Uhu (or other glue) and stick down your 1.5cm seam allowance all the way around the inside of your hat. Then leave it for a short while to dry of course :)


That is it for the first half of the tutorial but I will return shortly with the other half which covers decorating you hat and adding a lining and hair loops.... see you soon!
 
Bye xXxXx
 
P.s. if you have any questions about any of the materials, stages or things that seem unclear I will be happy to answer or try to explain as best as I can :)
 
Bye xxx


Tuesday, 27 January 2015

Fascinator post update...

Hello everyone,

Just to say the first half of my fascinator tutorial I have been teasing you all with is coming tomorrow evening!
 
Here is a sneaky peak of what ill be showing you how to make- but you can of course experiment with your own colours and decoration:

 
See you all verrry soon!
 
I hope you are all safe and well :) xxx
 
Bye xxx

Saturday, 26 July 2014

Soutache style jewellery tutorial

Hellooo,

As I mentioned in my last post I have been putting together a special tutorial for you all :0) And the tutorial is for some Soutache style jewellery:


Soutache is a really interesting craft that I learnt about when watching Create and Craft one morning :) It is essentially a craft which uses braid and beads/gems which are all sewn in pretty, often swirled patterns to create beautiful jewellery and decorations- used to decorate military uniforms in the past. There is tons more information and soutache inspiration on This! website. When watching create and craft I really wanted to try making soutache items but... I didn't have any special soutache cord, backing material etc... However, after a bit of experimentation I found you could create soutache style pieces (see picture above) using items that most crafters will have in their stashes (+ a bit of imagination of course :)

The piece I made above is just to give you an idea of the kind of thing you can make- I encourage you to go with the flow really, I just 'free styled it really'- coming up with the design as I sewed, and just swirling the cords and adding beads however looked good.

To begin you will need:


  • Some shiny/slightly silky fabric (remnants will do)
  • Felt
  • Flat back stones/gems or larger flat beads
  • seed beads (optional)
  • A pen/pencil
  • A hot glue gun/craft glue (not needed if you are not incorporating flat backs)
  • A roleau turner (optional- but it does make things easier)
  • Needles and Matching colour threads.
  • Scissors
  • And as I said before a bit of imagination! :)

Now onto how to do it:

I mentioned that instead of using braid I came up with and alternative and that alternative is lengths of roleau (a cord made using long thin strip of fabric cut on the bias which is stitched and then turned through). There is quite an informative tutorial for how to make roleau cords Here! That page also shows you how to turn through your roleau using the needle and thread method. Whereas in my quick roleau tutorial below I just use a roleau turner. 

Right so ad I mentioned to make your roleau cord take your chosen fabric and cut some bias (45 to the selvedge or straight of grain this gives the fabric more movement and stretch so helps when bending the roleau and turning it through) strips (make them about half the width of a standard ruler and just as long as you can get from your remnants :)


Fold each strip right side to right side and sew down the strip about 3 - 4 mm in from the fold. Then trim down your seam allowances to a few mm:


Turn through:


You now have your mock - soutache cord and can begin creating you design...

... Cut a square of felt big enough for your design and take the flat back or bead you want in the centre of your design/to start with and glue or sew it down in position on the felt:

Now, as I said before I didn't want to create a tutorial for the exact piece I made as it is often nice for people to explore their own ideas so I am not going to go through the exact positioning for my roleau but I will go though the special way of sewing them in so you can hide all your stitches- then you can just go with it and sew them in it whatever positions you like. Also just as a note you can sew two cords on together at the same time (just follow the stitch below but go through two cords at the same time).

Firstly put a no knot in your thread and come up from the back near your gem. Take the piece of roleau you want and pass the needle and thread through it from the folded edge to the front seam:

Then go back through, slightly further along, through the front seam to the folded edge and back down into the felt, again slightly further along than where you came up out from:


This is the stitch you use to sew on your roleau. Just keep going all the way around etc.. doing this until your cord is fixed down how you want it. You are effectively hiding your stitches in the roleau seam :)


If you want to secure two ends of a roleau together just go backwards and forwards through each end a few times (again hiding your stitches in the seams) before passing your needle to the back and knotting off:


You can play around and sew the ends how you want:


TO finish off the raw cut ends just glue them slightly to prevent fraying and over sew them down (or pass them through the back of the felt using a large needle).

Keep adding more roleau cords to your design- you can even get little Catherine wheel type swirls by rolling up the roleau and passing your needle and thread back and forth a few times through the wheel and down into the felt to secure:


Add more gems/beads by glueing or sewing :) sewing seed beads in between the roleau can look good (I deliberately spaced about my roleau when sewing it so I could do this more easily):


I sewed them on on bunches of three with a running type stitch:


Here is a close up of how I finished my ends (you could do this for each end individually if you didn't want to overlap them):


Thu back doesn't have to be too neat :p when you are happy cut around it- be careful not to cut any of your stitching though! :

Trace around your piece onto another piece of felt and cut the shape out:


Glue or sew this 2nd piece onto the back of your soutache style creation, add a brooch pin or whatever you want and you are good to go:


Look, all done! :-):


He he he, I hope you like the tutorial. If anyone makes any soutache style jewellery using my tutorial I would love to see pics so please do post a link or send me a picture (iitki@hotmail.co.uk)

Also if you have any questions don't hesitate to ask and I will try to explain things better :p

See you all soon, I hope you are having a lovely weekend,

bye xxxxx


Wednesday, 15 May 2013

Stitched strawberry tutorial!

Hi everybody,

Today I bring you a summery (even though it keeps on raining!) tutorial on how to make a stitched strawberry :0) 

As I mentioned I made them with my textiles club and they are very fun and easy to make, I made all of these in just over an hour:


I am going to show you how to make the traditional style choc dipped strawberry in the picture- but as you can see you can get creative and pretty much use any scraps of fabric you have to get make crazy coloured berries!

To 'get your fruit on!' :P you will need:
  •  Any old off cuts/scraps of fabric (In red, green and brown if you want the choc-dipped strawberry)
  • Embroidery threads/cottons in different colours- depending on your chosen design
  • A small amount of toy stuffing
  • Scissors
  • A needle
  • A ruler for measuring
  • Craft glue- optional (you can choose to glue on the stalk/chocolate decoration if you wish)
  • Pinking shears- (optional)
And here are the steps:

1. Take your main chosen fabric and cut a semicircle of diameter (measurement across the top) 4 inches (10cm). But also of radius (measurement down) 4 inches ( 10cm ). So a kind of elongated semicircle really.


2. I you are making a dipped strawberry cut out a piece of your chosen dip fabric similar to that shown in the picture (otherwise just skip this step and follow the rest as normal for a plain strawberry):


Then fasten this to the main strawberry piece either using a small amount of craft glue or little stitches along the top edge of the dip piece (don't worry about down the sides or along the bottom- these are fastened later when you sew up the side)

3. Take a few strands of embroidery thread or doubled up sewing thread in seed colour and sew little seeds all over the main strawberry piece (you can do this after making the strawberry if you wish but it can be easier for fastening the thread if you do it now as you can use a knot hidden on the back to fasten the stitching).


4. Now you should have something like this:


5. Fold in half with right sides facing inwards.


6. Now using a matching colour thread sew little running stitches all the way from the base of the strawberry all the way along the curved edge slightly in from the edge. Stop when you reach the top edge- don't sew along the top, just leave the needle and thread attached at the corner as you will be using this to fasten up the top later.


7. Turn your strawberry the right way out and stuff until it is nice and juicy! :oP


8. Next using small running stitches again sew all the way around the open top edge and then pull gently to gather up and then fasten off the thread so the top is closed securely.


9. Take your stalk fabric and cut about a 1 inch by 1 inch square using pinking shears (3.5cm x 3.5cm)


You can then cut out further little triangles from the edges of the square to create a realistic looking stalk:


Alternatively if you don't have pinking shears you can just experiment cutting out different star style shape pieces for stalks, or just cut a normal square and then cut extra triangles until you are happy with the effect

10. Finally sew your stalk to the top of your strawberry over the gathered area using a matching coloured thread and small stitches in the centre of the stalk piece (alternatively you can glue it on if you wish)

And Viola!

You have your own piece of fruity loveliness:


Each one you make is always slightly different- just like the real thing, which is part of the fun :P

And now you can keep going and make tons more if you want- they can be little gifts, decorations, made into accessories etc... I think I am going to try putting several in an old jam jar and putting a bit of ribbon round the top- I think that would look very pretty :)


I hope you like the tutorial :D

See you all soon,

Byeee xxxx

P.s. If anyone makes some of the strawberries and wants to send me a picture I would love to see them (iitki@hotmail.co.uk) and if anyone thinks of any more cool ideas on how to use them please do leave a comment- I have made quite a few so any more ideas on how to use them would be a help!

Bye :-P