Showing posts with label recycled. Show all posts

Thursday, 20 February 2014

Macaron madness! (and other stuff)

Hiiii!
 
I hope you have all been having a lovely week and it's Friday tomorrow so the weekend is not far away either :)
 
As I mentioned in my last post, the Saturday just gone I took my mum for a cream tea at Hush Brassieres in London- it was very nice and they had mini macarons. I wasn't sure if I even liked macarons (I didn't think I did) but after one bite I was hooked- they were soo tasty and fun!
 
When I went out with my family on Sunday my dad treated me to a box of mini macarons (just like the ones from the cream tea) from Marks and Spencers. I have been very much enjoying working my way through them:

 
Mmmm yummy!
 
I have officially been bitten by the macaron bug as on Tuesday this week after I finished early at college I tried making some of my own raspberry ones. I wasn't sure how they would come out as I had never made them before and had heard that they are notoriously difficult. I did some searching on the internet and found this youtube video: click here! I followed all her tips to the letter and left them with their filling inside in the fridge overnight (to moisten slightly) and they were almost perfect, apart from they weren't the pinky colour they were supposed to be as I couldn't get any food colouring :P:


I was so proud! I still have to hone my skills as I think I may have got a bit lucky how they came out with their feet and everything first time. I shared them with the girls at college who said they were really tasty so I was happy- I thought they did have the right macaron texture and flavour :)
 
And Just in case I hadn't made enough macarons already I ended up creating a pattern for a crocheted macaroon that evening! lol:

 
I think it is quite kawaii- now all that is left to do is make up lots in different colours (or flavours :P).
 
Hehehe, in other non-macaron related news yesterday after college one of the 3rd years ran a mini recycling project thing (as part of his final year project) which was really fun. We got to work with wrappers which was cool as I like to use these in crafty ways too. We made oyster card holders by fusing plastics together with the heat from irons and then sewing the plastics together. Here are mine:

 
One skips one...

 
And one Cadburys marvellous creations on (I love this chocolate!!!)...

 
I will definitely be using the heat technique to maker more wrapper stuff in the future!

The last instalment in this rather long post is a couple of pictures of the tasty food I ate at Giraffe - a really fun restaurant I went with my family on Sunday and a picture of my Ice cream from the Harvester which I went to with a friend from college today :) It was all so good, I had to share it with you guys!
 
This is the Farmers market burrito from Giraffe, sorry the picture is a bit blurry I was excited to get eating it :P:

 
and here is my brownie and ice cream dessert from Giraffe:

 
Warm, gooey and sweet- delicious!
 
I will definitely be going back to Giraffe as the food was really good and tasted really fresh :)

Hehe, and last but not least my minty aero Harvester sundae:


Again, very good, but safe to say I didn't need any dinner today and am also a bit worried about possibly having to do a corset fitting tomorrow, lol :P I actually went with the girl who I am making a corset for but luckily I did her fitting this morning, before we went and ate tons of salad bar and ice cream!

Sorry- I am done now! You can go and rest your eyes now :-P

Speak to you all again very soon,

Byeeeeeeeee xxxxx

Sunday, 9 June 2013

Crochet box

Hello,
 
Some of you may remember the tutorial for the crisp packet coaster I did a while ago (if not it is on the free pattern page if you want to check it out :)
 
I kept saying to myself I wanted to turn some into a box but never did. Finally about a week ago I got round to it and sewed a few of the coasters I made a while ago into this little pencil pot:


It was sitting in my room and my brother said he really liked him so I said he could have it- it was just my little experiment but now it has a home :-P

I might try making some large versions of the coasters- placement size to make table setting sets and maybe even try making some boxes with lids- I will do some more experimenting!

See you all soon,

Bye xxx

Tuesday, 11 September 2012

Pop tab friendship bracelet - tutorial! :D

Hello everyone,
 
Today I bring you the new tutorial I made- Pop tab friendship bracelets:
 
 
A while ago my crisp packet coaster tutorial was mentioned on another blog and in the same post was a tutorial for a flower decoration made out of pop tabs- the ring pull bits of soda cans (links coming soon I just can't get them to work at the moment). I hadn't thought of using these for crafting before and it made me want to experiment with them. I collected up a few and after some playing around came up with the idea for the friendship bracelets above :-)
 
Here is how to make some if you would like to make some :P
 
You will need:
 
 
> DK yarn in any colours you want
> A 4mm crochet hook
> 9 pop tabs :)
 
How to make:
 
1. Join your first choice of yarn to your first pop tab and 4dc into the top of the pop tab.

 
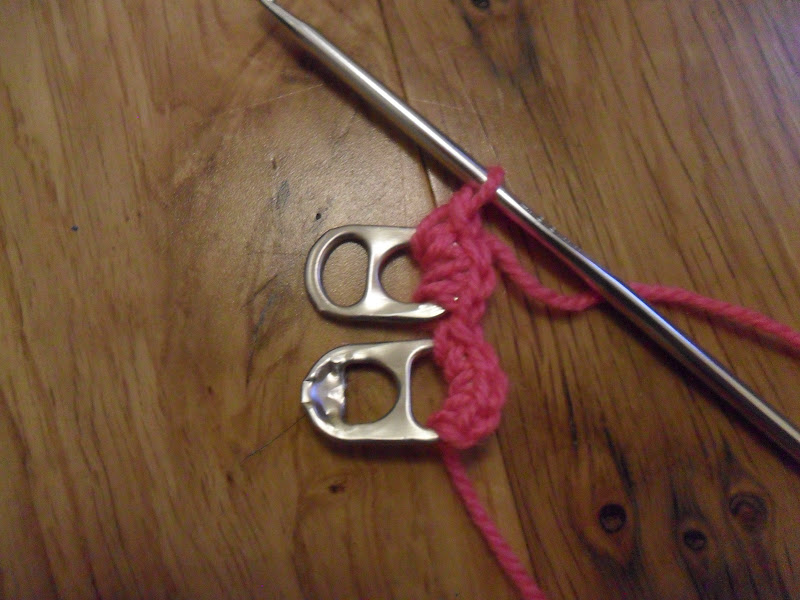
2. Take the next pop tab, attach it by crocheting 4dc into the top, like for the first tab but turn the second tab the other way round as in the picture below. (This creates an interesting design in the final bracelet if you crochet one tab round one way then the next the other way :)
 
 
3. Continue along doing 4dc into each stitch until all 9 pop tabs are joined then slip stitch into the top of the last tab to fasten.
 
 
4. Turn and repeat down the other side with your second colour yarn.
 
 
5. Darn in all loose ends

 
6. Then cut two lengths of each colour yarn around 25cm long each.
 
 
7. Join one set to the end of the bracelet in the following way:


8. Then repeat for the other set at the other end of the bracelet (these are the ties so you can tie it round your wrist :) and Voila, you are all done! Make sure there are no sharp ends of the tabs poking through at all before you wear it though, just for safety!
 
 
You can have fun and make them in all different colours for all your BFFs, lol :D
 
I hope you like the tutorial! :)
 
See you all soon,
 
Byyyyeeeeee xxx
 

Wednesday, 18 July 2012

Recycled jar lid pincushion - Tutorial

Hello everyone!

I haven't put up a tutorial or pattern in a while so I thought it was about time I did! The recycled jar lid pincushion is an idea I came up with a while ago but hadn't got round to getting a tutorial together until now :)

They are super easy and quick to make and you can try them in loads of different styles depending on what fabric you have and what you decorate them with/embroider onto them :D

Here are some samples I made:


And here is how to make your own!:


You will need:
  • Any old jar lid
  • A piece of scrap fabric (a few times larger than your jar lid)
  • A couple of handfuls of stuffing
  • Some scissors
  • A ruler
  • A pen
  • A needle
  • Some thread
  • A piece of felt (optional)
  • Whatever decorations you wish!
How to:

1. Take your jar and remove the lid, any type of lid will do :-)
 

2. Clean your lid thoroughly!!! You don't want your finished pincushion to smell like pasta sauce or pickled onions!


3. Measure the radius of your lid- the distance from the centre to the outer edge (mine is about 3.5cm).
 

4. Then take your piece of fabric and measure and draw out a circle of radius 2 and a 1/2 times bigger than that of your lid onto it. Add about 1/2 a cm to the radius of your jar lid before you calculate the radius needed of your fabric circle (Add about 1cm instead if your lid is quite thick, like the lid of the chocolate spread jar in the photo).

(e.g the radius of my fabric circle was 10cm as my lid had a radius of  about 3.5cm > so > 4cm once add 1/2 cm and 2.5 x this is 10cm)

You don't have to be super accurate here, if your lid has a radius 3.1cm just round it 3.5cm and then do the calculations above. Make it easy for yourself :0)
 

5. Cut out the circle


6. Next thread your needle doubled up style (cut a long length of thread then pull it through your needle so the middle lies in the eye of the needle, like you are sewing with two strands of thread). I do it this way so that it is stronger for when you pull on it to gather up the material later, so it doesn't break.


 7. Sew running stitch all the way around your fabric circle about 1/2 a cm in from the edge. Once you have done this pull on the thread slightly to gather the material loosely like so:
 

8. Stuff quite a bit of stuffing inside your gathered pocket.
 

9. Then slide your lid under the gathered edge and above the stuffing (with flat side facing down, like in the picture). This will form the base of your pincushion and stop the pins sliding through and jabbing you, like they often do to me when I pick up my pincushions!

You can add more stuffing under the edges of the lid if you think your pincushion will not be puffy enough.
 

10. When you have reached a suitable level of stuffedness/puffyness :) gather up the bottom of your pincushion tightly and secure. You can stick a circle of felt on the bottom if you want to make the base look neat.


It should now look something like this:


11. Finally decorate however you wish and your pincushion is finished! Viola!:


:)

----------

I hope you all liked the tutorial!

Make lots of them and give them as gifts to your fave crafty friends! :D

Hehehe, See you all soon <3

Bye XxXxX

(P.S. Please do not sell items made from this tutorial without asking permission first, thanks xxx :)

Friday, 11 May 2012

Recycled quilt

Hi everyone,

The other day I was sifting through my sewing box and found the beginnings of this quilt I started making out of old t-shirts and fabric:


I completely forgot about it but was happy to have stumbled across it as I was looking for my next project :) It might take me a long while because I want it to be realllllly big and snuggly! I have lots of old t-shirt and bed-spread fabric, I think it will look really cool and colourful when it is done as all the fabric is of different textures and patterns.

I think I'll go sew on the next hexagon now :D

I hope you all have a lovely weekend,

See you all soon xxx

Monday, 7 May 2012

Summer bolero - finished!

Hello everyone,

I finished my bolero!!! :D I was so happy that it came out how I wanted that, despite the weather not being that great today, I donned my new bolero anyway (with a long sleeved top underneath though - it was much to cold for the vest top and shorts I planned to wear it with!) and set off on the canal boat trip, which was very fun (but rainy!)

Hehehe, here is me modelling it......


I am hoping it will get lots of wear over the summer :)

In other news I made one of my crochet crisp packet coasters for my driving instructor :-) Last lesson we were having a chat about recycling and my crafting and when I was saying about bags I have seen made from recycled packets and my crocheted crisp packet coasters and my instructor was intrigued on how textiles/crochet could be mixed with food wrappers, So I made her this one:


I hope she likes it, I get to give it to her tomorrow :0)

I hope you all had a nice weekend/bank holiday!

See you all soon,

Bye xxxXxxx

Friday, 1 July 2011

Crochet crisp packet coaster tutorial!

Bonjour :)

I hope you all saved up some food wrappers and cardboard like I said, as today I thought I would post a tutorial on how to make a crochet crisp packet coaster!!!! You can use any food wrapper, I just first made one with a crisp packet :)


They are pretty much recycled and are quick to make and I think they look great. They come in very handy at parties as everyone can choose one, (their favourite food!!!) and there is no more problem of mixed up drinks! Make them now ready for your summer party/barbecue, you can never have to many coasters...

You will need:

  • Some cardboard e.g from old cereal boxes or birthday/Christmas etc... cards
  • Some food wrappers (about crisp packet size)
  • A pen
  • Glue
  • Scissors
  • Ruler
  • Hole punch
  • 3.75mm crochet hook
  • Small amounts of any DK yarn of your choice (e.g chosen to match your wrapper)
  • Darning needle
How to make them:

Firstly take your cardboard, measure and cut out a 10cm by 10cm square. It doesn't matter what is on either side of the square as you won't see this when your coaster is finished.


Next take your chosen wrapper and place the cardboard square on top of the area of your wrapper you want to be shown on your coaster. Draw around the square.


Then remove the cardboard and place it to one side and cut out the shape from the wrapper, make sure you cut through both sides so you end up with two squares (one from the front of the wrapper and one from the back), both the same size as the cardboard.


Now glue one piece from the wrapper to one side of the cardboard square and the other to the other side. (You can use any glue just make sure it dries before continuing with the next step).


Now this is the tricky bit :/ Take your hole punch and punch 9 holes along each side of your square. (Corners are shared so there are 32 holes in total, see picture if confused)
I recommend you practice on a 10cm x 10cm piece of paper before trying it on your coaster.


After you have done that care fully snip off a little bit of each corner. This makes the corners easier to crochet around and gives them a more rounded finish :)
(It also stops the corners sticking out of your finished coaster!)


Next take your yarn and crochet hook and join the yarn to one of the holes (do this however you normally join on yarn). Do 2dc into each side hole and 4dc into each corner hole. When you get to where you started join with a slst and fasten off.


Finally darn in any loose ends and voila! you have your finished crisp packet coaster :D


The back even looks good too... :0)


Heeehehhee a coaster that gives you nutritional information too, that's impressive!

Abbreviations:
(I am using UK crochet abbreviations)
  • dc = Double crochet
  • slst = Slip stitch
I hope you like the tutorial, you could even make one as a gift using a wrapper from someones favourite food :)

See you all again sooooooonnn

Bye xxxxx :D

(P.S. please don't sell items made from this tutorial, if you want to for charity or another reason please contact me first, thanks xxx)