Monday 30 July 2012

Holiday update

Hi guys,

I hope all of you are well! I found a place where there is Internet in the hotel so I thought I would do a quick post about my holiday so far :)

It is a pretty slow pace of life here in Malta so me and my family have just been having lazy and relaxing days really which is good as it means I have had lots of crafting time!

I got round to making some of these knitted chocolate bar brooches I had the idea for a while ago, I made some in milk and dark (I am having trouble with uploading pictures at the moment so I will post some up another time :o) I also made some hoods for my Blythes, a tiger one and a hamster one, and I stitched a mini creepy style prom dress for my Monster High doll.

There is a pool in the hotel though so I think I will come back fitter than when I left as I have been going swimming twice most days! hehehe :P The fruit here is also nice, especially the peaches, they ripen better than at home because of the heat.

There aren't many shops really, only mini supermarkets but one of them does sell some packet drinks mixes (kind of like kool aid) so I think I will be buying some of them to try some more yarn dying as I really enjoyed it when I dyed my own yarn before but they don't really sell the drink mixes in the UK.

I'm off for a swim in the pool now, then I might go buy those drink mixes, lol :P

See you all again soon

Bye XxXx


Monday 23 July 2012

Holiday time!

Hi,

Tomorrow I am off on holiday to Malta :) I am going for two weeks, sadly I don't think there is any Internet so I will have to take a blogcation too :( I will make sure to take lots of pictures though and when I get back I will also be celebrating my 2nd blogaversairy!!!! So I will be doing a special giveaway and maybe some other fun stuff too  :oD

I hope all of you have a brilliant two weeks while I'm gone!


Map from here

See you all when I get back (unless I manage to find a computer in which I will try to keep you all updated :)

BYEEEEEEeeeeeeeeeeeeee XXXxxxx

Sunday 22 July 2012

Dads Birthday and the Olympics!

Hi guys,

Today we celebrated my dads Birthday! :D It's not really his Birthday till the 26th but we are on holiday then and couldn't bring all his gifts so we celebrated it today :)

Yesterday I made him a cake ready for today, it took me about two hours, even though I was only following a kids recipe :P I was quite pleased in the end though and I finished it before I went driving with my friend :)


It is meant to be a Charlie and the chocolate factory, chocolate factory cake :0) My dad liked it and it was quite tasty (if I do say so myself :P) so I was happy!

Along with the mini knitted character I made my dad, as an extra gift I also let my dad choose a set of coasters out of all of the crochet crisp packet coasters I made recently because he always says he likes them :o) Here are the ones he chose:


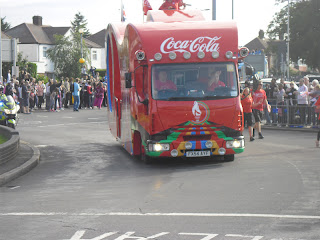
Before we had the cake and gifts though we went out and saw the olympic torch come down the street near us in preparation for the 2012 London Olympics!!!! It was very fun :) Even though we did have to get up quite early (6:15am)

There were a few different advertising veichles to see and we got some free little flags to wave and stick things you bang togther from the Samsung people and a free coke from the Coca Cola people too :-) Then the Olympic Torch came by. It was larger than I thought it was, I thoughti it was just slightly larger than ice cream size, lol! :P


In the afternoon, for a birthday lunch we went to Pizza Express (Yum!) so all in all it was a good day! 

I hope all of you had a good day too :)

See you all very soon,

Bye XXX

Wednesday 18 July 2012

Recycled jar lid pincushion - Tutorial

Hello everyone!

I haven't put up a tutorial or pattern in a while so I thought it was about time I did! The recycled jar lid pincushion is an idea I came up with a while ago but hadn't got round to getting a tutorial together until now :)

They are super easy and quick to make and you can try them in loads of different styles depending on what fabric you have and what you decorate them with/embroider onto them :D

Here are some samples I made:


And here is how to make your own!:


You will need:
  • Any old jar lid
  • A piece of scrap fabric (a few times larger than your jar lid)
  • A couple of handfuls of stuffing
  • Some scissors
  • A ruler
  • A pen
  • A needle
  • Some thread
  • A piece of felt (optional)
  • Whatever decorations you wish!
How to:

1. Take your jar and remove the lid, any type of lid will do :-)
 

2. Clean your lid thoroughly!!! You don't want your finished pincushion to smell like pasta sauce or pickled onions!


3. Measure the radius of your lid- the distance from the centre to the outer edge (mine is about 3.5cm).
 

4. Then take your piece of fabric and measure and draw out a circle of radius 2 and a 1/2 times bigger than that of your lid onto it. Add about 1/2 a cm to the radius of your jar lid before you calculate the radius needed of your fabric circle (Add about 1cm instead if your lid is quite thick, like the lid of the chocolate spread jar in the photo).

(e.g the radius of my fabric circle was 10cm as my lid had a radius of  about 3.5cm > so > 4cm once add 1/2 cm and 2.5 x this is 10cm)

You don't have to be super accurate here, if your lid has a radius 3.1cm just round it 3.5cm and then do the calculations above. Make it easy for yourself :0)
 

5. Cut out the circle


6. Next thread your needle doubled up style (cut a long length of thread then pull it through your needle so the middle lies in the eye of the needle, like you are sewing with two strands of thread). I do it this way so that it is stronger for when you pull on it to gather up the material later, so it doesn't break.


 7. Sew running stitch all the way around your fabric circle about 1/2 a cm in from the edge. Once you have done this pull on the thread slightly to gather the material loosely like so:
 

8. Stuff quite a bit of stuffing inside your gathered pocket.
 

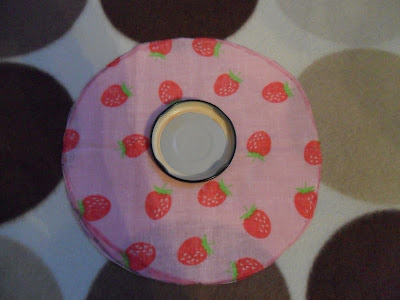
9. Then slide your lid under the gathered edge and above the stuffing (with flat side facing down, like in the picture). This will form the base of your pincushion and stop the pins sliding through and jabbing you, like they often do to me when I pick up my pincushions!

You can add more stuffing under the edges of the lid if you think your pincushion will not be puffy enough.
 

10. When you have reached a suitable level of stuffedness/puffyness :) gather up the bottom of your pincushion tightly and secure. You can stick a circle of felt on the bottom if you want to make the base look neat.


It should now look something like this:


11. Finally decorate however you wish and your pincushion is finished! Viola!:


:)

----------

I hope you all liked the tutorial!

Make lots of them and give them as gifts to your fave crafty friends! :D

Hehehe, See you all soon <3

Bye XxXxX

(P.S. Please do not sell items made from this tutorial without asking permission first, thanks xxx :)

Friday 13 July 2012

Driving teacher gift and the K-factor!

Hi,

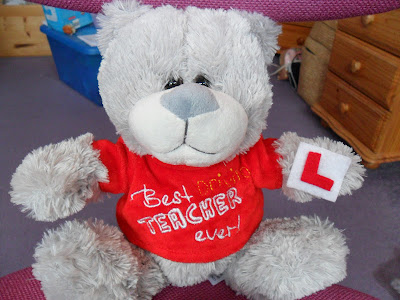
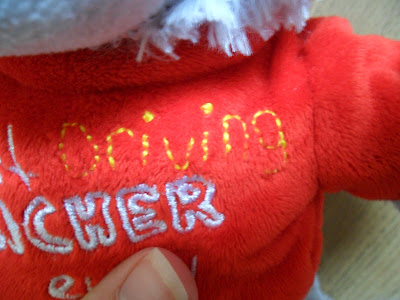
A few posts ago I mentioned I wanted to make my driving teacher a little thank you gift. I thought about loads of different things and looked at patterns on ravelry but when I was out I saw a cute teddy with 'Best teacher ever!' written on its little shirt and thought instead of making I might do some customising, to turn it into a best driving teacher teddy! I did some stitching on the shirt and added a little felt learner sign, here is the finished product! :):


Me and my mum wrapped him up in some cellophane with a bottle of wine too as an extra gift :-) I see my driving teacher tommorow as I am doing an extra day of driving called the Pass Plus Scheme (just some thing meaning you get to practice motorways and stuff), I hope she likes her customised teddy!


In other news....
Recently my mum bought some books and the company were doing an offer on the K-Factor knitting book (just £1!). My mum very kindly bought it for me as a little surprise present because she knew how much I enjoyed the K-factor stuff a while ago on Harry Hills program :P My dad also found it really funny so I thought I would make him something from the book for his upcoming birthday. I decided on a mini knitted character (a mini version of the main knitted item on the program :)

He came out quite sweet so I was happy, the book is really funny to read too so I had a laugh whilst making it!


Im sure my dad will like him, hehhehe :P

I'm off to get a good nights sleep now, ready for my day of driving!

See you all soon,

Bye XXXX

Tuesday 10 July 2012

My first Mochi Mochi

Hello everyone,

On Sunday me and my family went round my dads friends house, for Christmas him and his wife and kids got me a copy of the Mochi Mochi knitting book. All the stuff is very cute but as of yet I hadn't got round to making anything from it. I wanted to make something to take round but couldn't think of what, then I thought why not make a decoration out of one of the mini Mochi Mochis in the book! I had a look through and decided to make on the mushrooms (I left out the little side mushroom and just made the big one part). I was quite pleased with how it came out, especially as it was my first time of using DPNs too (Yay, I learnt a new skill! :P):


He matched the blue bag we took some other favours in too :)

Mr mini mushroom was liked alot, especially by my dads friends wife :0)

I hope you are all having a fantastic week!

See you all soon,

Bye Bye xxx

Friday 6 July 2012

Coasters galore :P

Hi guys!

Nearer to Christmas I am hoping to get to sell some of my crafty items so I have been starting to prepare my stock, lol :P I thought I would start with a few crocheted crisp packet coasters as they are fun to make and I think people would think they were quite fun :0) hehehe, I say some, I have cut out 25 here are some of them:


It is good to finally put a use to some of the wrappers I have stashed for ages! Some of the wrappers (like the Doritos one) are ones I collected whilst I was in Cyprus last year, I love collecting wrappers from different places with all the different languages on them and stuff :)

I'm off now to finish some more off, then I can plan my next bit of 'stock' to get making :-)

See you all soon,

Bye XXX

Sunday 1 July 2012

Blythe love

Konichiwa!

As many of you will know I collect blythe dolls :) The other day I was on ebay and I saw 3 beautiful basaak (blythe clone) dolls, I kept deliberating over which one to buy but in the end I ended up splashing out and buying all three! They were too sweet to resist  :3 (I also bought myself a carry case too!)
The other day they all came in a big box so I opened it and had fun dressing them all up for about an hour. I bought ones with different hair colours/styles to the ones I already have as I am trying to kind of make a blythe rainbow family :) Here are all my girls now:
 

(From left to right; Etty.M, Beth, Mirabelle, Candy, Sarah-Arabelle, Catherine)

I love them all so much <3 (^-^)

Candy's outfit is one of my new d The fabric has little Russian dolls on it and I added little gems for decoration and then I crocheted her the pink hoodie to keep her warm :-)


The carry case I bought also arrived on the same day which was good as it meant I could take a couple of my dolls with me to London Zoo today :D

I think Mirabelle enjoyed her self! Here she is looking at the giraffes, wearing the top and hood I made her especially for todays outing :P:


I think Candy had a good time too, she liked the monkeys and the birds best!


Hehehe, I hope you all had a good day too :o)

I'm off to go and tuck them in in now after their busy day!
 
See you all soon,
Bye XxXxX <3