Showing posts with label free pattern. Show all posts

Sunday, 1 December 2013

*Free Knitting pattern*: Festive yule logs!!! o<:0)

Hello everybody,

Happy 1st of December!
 
Advent starts today- yay :D I am so happy, I have a Lindt, Thorntons and zhu zhu pets toy advent calendars, how lucky am I? :) My tree and decorations officially go up today too so that is also exciting!
 
To mark the start of the festive month I thought I would put up a free knitting pattern- my latest design- these mini yule logs, with an opening at the bottom to pop a treat in!:


I made a traditional one and also a winter wonderland frosty snow style one (you can pretty much pick your own colours though to create whatever flavour or style of log you want :).
 
They are relatively quick to make as they don't require much sewing and are knitted all in one piece but they are very cute and would make the perfect table setting at a festive dinner party- that is what I am going to use them for :-)
 
_*_*_*_*_*_*_*_*_*_*_*_*_*_*_*_*_*_*_*_
 
Lets get started!...
 
You will need:
 
For the main cake piece:
  • 3.25 mm knitting needles
  • DK yarn in your cake colour (a lighter/reddy brown for the traditional log or sponge cake colour for frosty log)
  • DK yarn in your frosting colour (a dark brown for traditional or white/cream for frosty log)
  • A small amount of DK yarn or embroidery thread for your swirl of cream filling (white for traditional, red for the frosty log)- The swirl is optional but I think it adds the perfect finishing touch :)
  • (Per cake) an 8cm x 8cm square of cardboard.
  • Darning needle
  • Scissors
  • A hot glue gun/strong craft glue (this is optional but is useful)
For the holly decoration:
  • Red buttons, knitted balls, beads, pom poms or whatever you like for the berries :)
  • Green felt for the leaves, or you could knit some little leaves and sew them on instead, once again- whatever suits you really! :)
For the snowy/glitter top:
  • Clear nail varnish or glue that dries clear
  • Glitter
  • Paint brush

Pattern:

Using 3.25mm needles and DK yarn in your cake colour cast on 4sts, then work as follows:

- Kfb into each stitch (8sts)
- P across row (8sts)
- Kfb into each stitch (16sts)
- P across row (16sts)
- *K1, Kfb into next st* repeat from * to * across row (24sts)
- K across row (24sts)

Change to your icing/frosting colour and work 27 rows of: K2, P2 ribbing

Then change back to your cake colour and work as follows:

- K across row (24sts)
- *K1, K2tog* repeat from * to * across row (16sts)
- P across row (16sts)
- K2tog across row (8sts)
- P across row (8sts)
- K2tog across (4sts)

Then thread end of yarn through the 4 remaining stitches on the needle and gather them up.

Making up:

Sew up the cake coloured ends of the cake (so they form the circular ends- gather the 4sts at then end then seam together).

Then sew in from each end, along the main body of the cake (The icing/frosting coloured piece), leaving about a 2inch gap in the centre. (This is so that you can get your cardboard piece and sweet inside :)

Make sure all loose ends are darned in and cut and then sew a swirl of filling on at each end of the cake in backstitch if you wish.

Next roll your cardboard piece and pop it inside- making sure the two edges of the rolled cardboard are in line with the opening of the kitted piece (So you still have an opening you can get a treat in to and out of :P). You can then glue the edges of the knitted piece flush with the edges of the cardboard if you want. This will fully cover up the cardboard piece giving a neat finish and it will hold it in place too :)


The opening/slit lies hidden on the bottom of the cake- The decoration is applied to the other side/the top side.

(If you do not want an open roll just pop the cardboard inside and then just seam up the last 2 inches instead)

For the glitter effect, paint some of your clear nail varnish or clear drying glue over the top of your roll then dip your paintbrush in your glitter and brush it over where you have applied the glue/varnish for a snow dusted effect:


Stick or sew on your holly decoration or other chosen decoration.
 
Then last but not least, pop a sweetie or surprise inside and; voila!
Your mini yule log is complete :-)
 
 
When you are done with your yule logs and the treats inside are gone you can always pop them on your tree by just pushing a pit of one of the branches through the opening in the back!
 
 
_*_*_*_*_*_*_*_*_*_*_*_*_*_*_*_*_*_*_*_
 
I hope you like my pattern, I had lots of fun making it  :D
 
If you have any questions/queries about the pattern or making up or anything don't hesitate to comment below.
 
See you all soon,
 
Bye xxXxxXxxX
 
 
P.S:
I am using standard UK knitting abbreviations:
 
Kfb - Knit into the front and back of the stitch (increase by one)
st/ sts - Stitch/ Stitches
P- Purl
K- knit
K2tog- Knit two stitches together (decrease by one)
 
 
P.P.S. Please do not sell items made from this pattern without asking first, Thanks :)

PPPS!!!- I have listed more new items in my Folksy shop and as it is now December I am offering FREE GIFT WRAPPING on every order! :) Please do pop over and take a look- just in case you see anything you like: http://folksy.com/shops/handmadebyjordan

Byeeeeeeeeeee oxoxoxo
 

Wednesday, 4 September 2013

Domo/monster innocent hats

Hi,
 
As many of you will know I have begun making hats for the innocent smoothies for this years big knit :)
 
Domo is a big part of my life and his latest bit of inspiration rubbed off on some of my hats :P
 
Here they are:
 
 
I made a brown one and a pink one- the traditional colours, but I may start making some random coloured little monsters too!
 
To make a monster/Domo hat it is pretty similar to the basic pattern but you just have to include a red intarsia square and some little teeth and eyes;
 
Pattern-
 
Using 4mm needles and the main colour DK you have chosen for your Domo/monster hat cast on 28sts
 
Knit two rows of k1, p1 ribbing
 
row 3- k 11 sts in brown, swap to red and k 5 sts, then swap back to brown and k the last 12 sts (using intarsia method of bringing different coloured yarns across back of work)
 
row 4- p 11 in brown,  p 5 in red, p12 in brown
 
Repeat rows 3 and 4 two more times :)
 
row 9- k across whole of row in brown
 
row 10- P across whole of row in brown
 
Repeat rows 9 and 10 2 more times
 
row 14- K2tog across (14sts)
 
row 15- P2tog across (7sts)
 
To finish thread yarn end through remaining stitches on needle, draw up and sew down back of hat- darn in and cut all loose ends also. Then using black yarn give your little monster two eyes and stitch/stick on some small strips of white felt which have been cut with pinking shears along one edge.
 
All done
 
Hahaha, I hope you like the hats-  I will have more to show you soon, I am sure of it :0)
 
See you soon,
 
Byeeee xXxXxX

Thursday, 7 February 2013

Comic relief/ Red nose day Monster :0) Free pattern!


Hello everyone :)
 
It has been a while since I put up a free pattern and I had a request posted on my Red nose day monster post  about possibly making the pattern available so one could be made to be raffled off to support comic relief. (Red Nose Day is a day organised by the charity comic relief which support all different kinds of charitable projects around the world and in the UK, and yes, for those that don't know, you can wear a red nose on that day to show support! :P Comic relief challenge people do do fun stuff to raise money for the charity too).
 
I had made the pattern up as part my idea to be sponsored to knit something in order to help the charity, but I thought the idea of raffling a monster off was a great idea too! I scrabbled around and found the bit of paper I jotted the pattern on and I bring it to you here today so you get creative and help out the cause too if you want too- Red nose day is coming up on the 15th of March! :-)

Please do let me know any other ideas of how you could use the pattern and send me pictures of your monsters too if you make any to iitki@hotmail.co.uk :)
 
Here is a reminder picture of my little monster:


And here is how to make your own:

You will need:
 
3.75 mm needles

Red DK yarn

Several handfuls of toy stuffing

Googly eyes and glue to stick them on (or your choice of eyes)

A darning needle

Scissors

A crochet hook (for pulling through and attaching the hair)

A large pom pom for the nose (you can buy one or make your own)

White felt for the tooth decoration (or whatever decoration you want)

 
Pattern:

Body (make two):

*Cast on 10 sts

K 1 row

P1, Pfb, P to last 2 sts, Pfb, P1

Stst 8 rows*

Leave these sts on the needle and repeat from *to* for next foot

K 1 row (across both feet to join them)

**P1, Pfb, P to last 2 sts, Pfb, P1

K 1 row**

Repeat from ** to **

P1, Pfb, P to last 2 sts, Pfb, P1

K1, Kfb, K to last 2 sts, Kfb, K1

P1, Pfb, P to last 2 sts, Pfb, P1

Stst 18 rows

K2tog, K to last 2 sts, K2tog

P 1 row

***K2tog, K to last 2 sts, K2tog

P 1 row***

Repeat from *** to *** 4 more times

“”K2tog, K to last 2 sts, K2tog

P2tog, P to last 2 sts, P2tog””

Repeat from “” to “” two more times (leaving 10 sts on the needle)

Cast off in K but K2tog at each end as cast off


Making up:

Sew the two body pieces right side together leaving an opening at the top, turn right side out, stuff and sew up the opening by overstitching. Add all the face decoration e.g. glue on the googly eyes and small triangles of white felt for teeth and sew on the big pom-pom nose. Then cut many lengths of yarn double the length you want for the hair of your monster, fold in half and use the crochet hook to pull through the top of your monsters head and  tuck the ends through the loop you pull trough and pull to fasten the hair on. Repeat till your monster has lovely thick flowing hair! :P

Then you are all done, and you can have fun and help out with your new monster friend!

I hope you like the pattern, if you have any questions or issues (seen as I got the pattern from my scribbledy notes, don't hesitate to comment below and I will reply :-)

See you all soon, byeeeeeeeeee XXX

P.S. I am using standard UK knitting abbreviations :)
 

Thursday, 20 December 2012

Christmas crafting

 
Hi guys,
 
Thank you for all the good wishes for my interviews :0)
 
The other day one of the people who work with my mum gave her a cool costume calendar to give to me as a present. It was so cool and had some beautiful pictures of period costumes in it, I can't wait to start using it in January :) As a thank you I made her two of my Christmas tree decorations (pattern can be found on the free pattern page at the top of the blog! :-):
 
 
My mum said she really liked them and left them on her desk all day and kept telling people I had made them! Hehehe, that made me smile :)
 
Another gift I made was this pincushion for my sewing teacher as it was the last class last Wednesday (sorry for the picture I took it just before I went to the evening class so it was a bit dark in my room):

 
I was pleased with how it came out, I went for a super-christmassy theme! My teacher thought it was sweet so I was very happy as I was a bit unsure about giving her a pincushion as I thought she might have hundreds of them already :P
 
I'm almost done for my preparations for Christmas and tomorrow I break up for the holidays so I should then have time to finish off the last little bits.
 
I hope you are having a lovely week and are looking forward to Christmas as much as I am lol! :D 
 
See you all soon,
 
Byeeeeee XXXxxxXXXxxx

Wednesday, 19 September 2012

Innocent smoothie gnome hat pattern

Hi everyone,

It's the time of year for the innocent smoothie big knit again supporting Age Uk! I started making some hats and then came up with the idea for a gnome hat :P


I thought I would put up the pattern in case anyone else wanted to make some and get involved :)

The pattern uses the same materials as the original basic innocent hat pattern so you just need some 4mm needles and DK yarn in any colours you like!

Pattern:

In the rim colour cast on 28sts
Row 1-4: Gst
Row 5: Change to the main hat colour and then; k2tog, k to end, k2tog (26sts)
Row 6-8: Stst (beginning with a p row)
Row 9: k2tog, k to end, k2tog (24 sts)
Row 10- 12: Stst (beginning with a P row)
Row 13: k2tog, k to end, k2tog (22 sts)
Row 14-16: Stst (beginning with a P row)
* Row 17: k2tog, k to end, k2tog (20 sts)
Row 18: P *

Repeat from * to * until 10 sts remain

Then: k2tog x 2, k2, k2tog x 2 (6sts)
Next row: P
Then: K2tog x 3 (3sts)

Making up:

To finish draw up the remaining 3sts, sew down the side (with right side facing inwards), darn in loose ends then turn right side out. You can add buttons or pom poms etc.. to the point of the hat  or any decoration if you wish :)

And your gnome hat is all finished! o<:0 u="u">
 
I hope you like the pattern and have fun making tons of different little hats for the innocent big knit! I love joining in every year :-) I will post up pictures of the other hats I make soon,
 
See you all soon,
 
Bye! xxx

Tuesday, 11 September 2012

Pop tab friendship bracelet - tutorial! :D

Hello everyone,
 
Today I bring you the new tutorial I made- Pop tab friendship bracelets:
 
 
A while ago my crisp packet coaster tutorial was mentioned on another blog and in the same post was a tutorial for a flower decoration made out of pop tabs- the ring pull bits of soda cans (links coming soon I just can't get them to work at the moment). I hadn't thought of using these for crafting before and it made me want to experiment with them. I collected up a few and after some playing around came up with the idea for the friendship bracelets above :-)
 
Here is how to make some if you would like to make some :P
 
You will need:
 
 
> DK yarn in any colours you want
> A 4mm crochet hook
> 9 pop tabs :)
 
How to make:
 
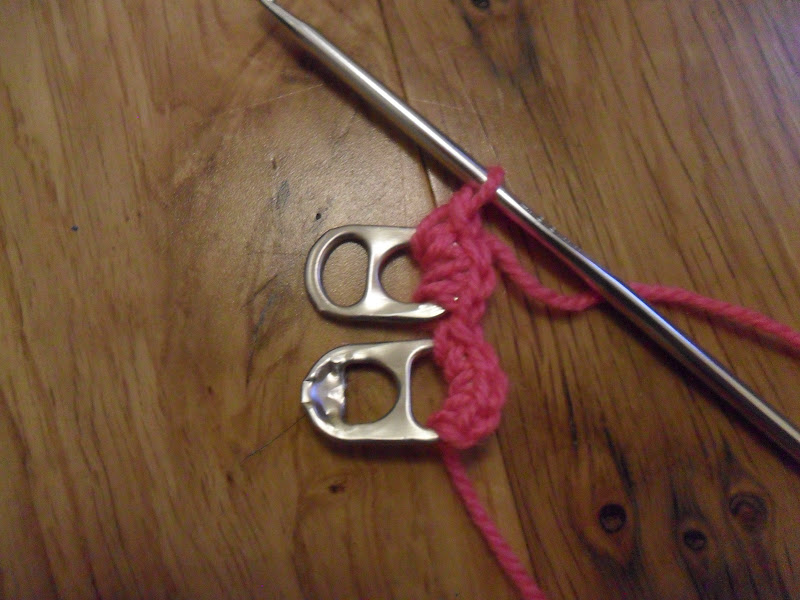
1. Join your first choice of yarn to your first pop tab and 4dc into the top of the pop tab.

 
2. Take the next pop tab, attach it by crocheting 4dc into the top, like for the first tab but turn the second tab the other way round as in the picture below. (This creates an interesting design in the final bracelet if you crochet one tab round one way then the next the other way :)
 
 
3. Continue along doing 4dc into each stitch until all 9 pop tabs are joined then slip stitch into the top of the last tab to fasten.
 
 
4. Turn and repeat down the other side with your second colour yarn.
 
 
5. Darn in all loose ends

 
6. Then cut two lengths of each colour yarn around 25cm long each.
 
 
7. Join one set to the end of the bracelet in the following way:


8. Then repeat for the other set at the other end of the bracelet (these are the ties so you can tie it round your wrist :) and Voila, you are all done! Make sure there are no sharp ends of the tabs poking through at all before you wear it though, just for safety!
 
 
You can have fun and make them in all different colours for all your BFFs, lol :D
 
I hope you like the tutorial! :)
 
See you all soon,
 
Byyyyeeeeee xxx
 

Monday, 21 May 2012

Cute orange blob pattern :D

Hey everyone!

Here is the pattern for the cute orange blob as promised :)

You will need:

Orange (or whatever colour you want) DC yarn
3.5mm crochet hook
A small piece of black felt
A smal piece of white felt
A pair of scissors
Craft/fabric glue
A darning needle
And a couple of handfuls of stuffing :)

Pattern:

The body and head is worked all in one, stuffing as you go along :0)

Using 3.5mm hook and DC yarn make a magic ring, 6 dc into ring (6sts)

2dc into each st around (12sts)

*1dc, 2dc into next st* repeat from * to* around (18sts)

*5dc, 2dc into next st* repeat from *to* around (21sts)

*5dc, 2dc into next st* repeat from *to* to last 3 sts, 3dc (24sts)

1dc around (24 sts)

1dc around (24 sts)

*5dc, 2dc into next st* repeat from *to* around (28sts)

1dc around (28sts)

*5dc, dc2tog * repeat from *to* to last 4sts, 4dc (24sts)

1dc around (24sts)

*5dc, dc2tog* repeat from *to* to last 3sts, 3dc (21sts)

*2dc, dc2tog* repeat from * to* to last st, 1dc (16sts)

*2dc, dc2tog* repeat from * to* around (12sts)

*1dc, 2dc into next st* repeat from *to* around (18sts)

*2dc, 2dc into next st* repeat from *to* around (24 sts)

1dc around (24sts)

*4dc, 2dc into next st * repeat from *to* to last 4 sts, 4dc (28 sts)

1dc around (28sts)
 
1dc around (28sts)
 
*5dc, dc2tog* repeat from *to* around (24sts)

*2dc dc2tog* repeat from *to*  around (19sts)

Stuff now! :-)

*dc2tog* to last st, 1dc (10sts)

1dc around (10sts)

*2dc, dc2tog* from *to* last 2sts, 2dc (8sts)

*1dc, dc2tog* from*to* last 2 sts, dc2tog (5 sts)

Fasten off

Making up:

Gather up top and darn in lose end. Then cut out felt like seen in picture and stick on with fabric glue :)

                                                                          All done!
 
I hope you have fun with your cute orange blob :D


Hehehe, see you all soon!

Bye xxx

P.s Please don't hesitate to ask if you have any questions about the pattern (or find any needed corrections) :)

Abbreveations:

(I am using UK crochet abbreviations)

st(s) = stitch(es)
dc2tog = double crochet two stitches together
dc = double crochet

Saturday, 25 February 2012

Free 'Happy weather' biscornu pattern chart!!! :o)

Hola!

Here, as promised is the chart for my 'Happy weather' biscornu design :D I have put pattern notes and a key below the charts for the sides of the biscornu, I have tried to make everything as clear as possible but this is the first cross stitch chart I have ever written/designed so if there is anything you don't understand don't hesitate to ask!

There is a handy guide on how to make up your biscornu once you have finished all your stitching here!

Happy Weather Biscornu :o)

Side one:

Side 2:

(Please don't sell items made from this chart without asking me first, thanks :-)

If you do make the biscornu: Happy stitching! :D

 
See you all soon,

Byeee byeee
xxxxx <3

Thursday, 22 December 2011

Dolls Christmas party :3 + Free Blythe Cracker hat pattern!

Hello everyone!

It has been a very fun day today :) Candy and Catherine had a special Pre-Christmas party today with thier newest friend Penny (A tangkou doll I bought on Ebay :) They chatted lots and drunk quite alot of orange juice too! For this special occasion I made them all some Christmas cracker/party hats, they liked them alot. Hehehe here is a shot I got of them all in deep discussion about how Candy keeps her hair so pink, lol!:


I thought I would give away the hat Pattern free just in case there are any other Blythes anywhere in need of party hats :0D

Here it is....

You will need:
  • A pair of 3.25mm needles
  • DK yarn in any colour you want (the better quality/slightly thicker the better as this stretches less when ironing flat)
  • A darning needle
  • A pair of scissors
  • And an iron (or you can block your piece)
Party hat pattern:
(Avoid knitting too loosely as this could lead to hat being too big)

Cast on 66 sts
Row 1-7: Stst 7 rows beginning with a K row
Row 8: In P, cast off 1 st at each end and work purl over rest of sts (64 sts)
*Row 9: K8, then working on these sts only (leaving rest of sts on needle) work first point:
(P across on all even rows)
Row 11: K2tog, K4, K2tog (6 sts)
Row 13: K2tog, K2, K2tog (4 sts)
Row 15: K2tog twice (2 sts)
Row 17: K2tog (1st)
Then fasten off for first point*

Rejoin yarn and work from * to * to work next point and then following remaining 6 points (8 points in total)

Making up:

Darn in all loose ends leaving just cast on thread for sewing up hat later. Then carefully iron hat piece to flatten slightly, avoid ironing the piece heavily as this will flatten it too much causing the hat to be too large. Alternatively you can block the piece to flatten, this takes longer but it you do not stretch piece too much this does reduce chance of hat being too big. (elastic can be sewn in to hat if this does happen anyway :) Then finally mattress stitch two end edges of crown together. You can then add any decorations you want :0)

All done!


I hope you like the pattern and I hope it enhances some other Blythe/doll parties! :0P

See you all very soon,

It's not long till Christmas now, I can't wait! 

Bye!! xxx

Abbreviations:
st(s) = Stitch(es)
K = Knit
P = Purl
K2tog = Knit two stitches together
Stst = Stocking stitch

Saturday, 17 December 2011

Quality Street Green Triangle - Free pattern!! :D

Hello everyone!

It is the tradition in my house at Christmas to have a big box of yummy quality street! Normally we open the tin before Christmas but this year my Dad said 'Christmas day is the opening day, otherwise all of the good ones are gone by then' :P

One of me and my brothers favourites are the green triangles (they disappear the fastest!) so I thought I would make a little pattern to make some woolly ones to replace the ones I eat so I can eat more before my brother notices they are all gone!


And just in case any of you have to employ the same tactics as me to get your favourite sweets I am giving away the pattern free :0P Here it is:

Crochet Green triangle Quality Street

You will need:
  • 3.5mm crochet hook 
  • Dark green DK yarn
  • A small amount of toy stuffing
  • A darning needle
  • And a pair of scissors
Pattern: (I am using standard UK crochet abbreviations)

Top (make one):

^Make a magic ring, 6dc into ring (6sts)

*1dc, 2dc into next st* Repeat from * to * around (9sts)

*2dc, 4dc into next st* Repeat from * to * around (17sts)

3dc, 5dc into next st, 4dc, 5dc into next st, 4dc, 5dc into next st, 1dc (27sts)^

(1dc into each st around) x2

Slst and fasten off

Bottom (make one):

Work from ^ to ^ then slst and fasten off

To make up:

Sew top and bottom together and stuff as you go along. Darn in any loose ends, Finished!

Hehehe, I hope you like the pattern :-)

I'm off to make lots more ready to replace all the ones I'm gunna eat on Christmas day, I'll leave my brother one, well, alright then, two! Because I like the toffees too :0P

See you all soon,

Bye! xxx

P.s If you make them in all different colours you can use them as giant trivial pursuit pieces, lol!

Bye XXX

Abbreviations:

slst = Slip stitch
dc = Double crochet
st(s) = Stitch(es)

Saturday, 1 October 2011

Plaster protectors - Extra designs :)

Holah!

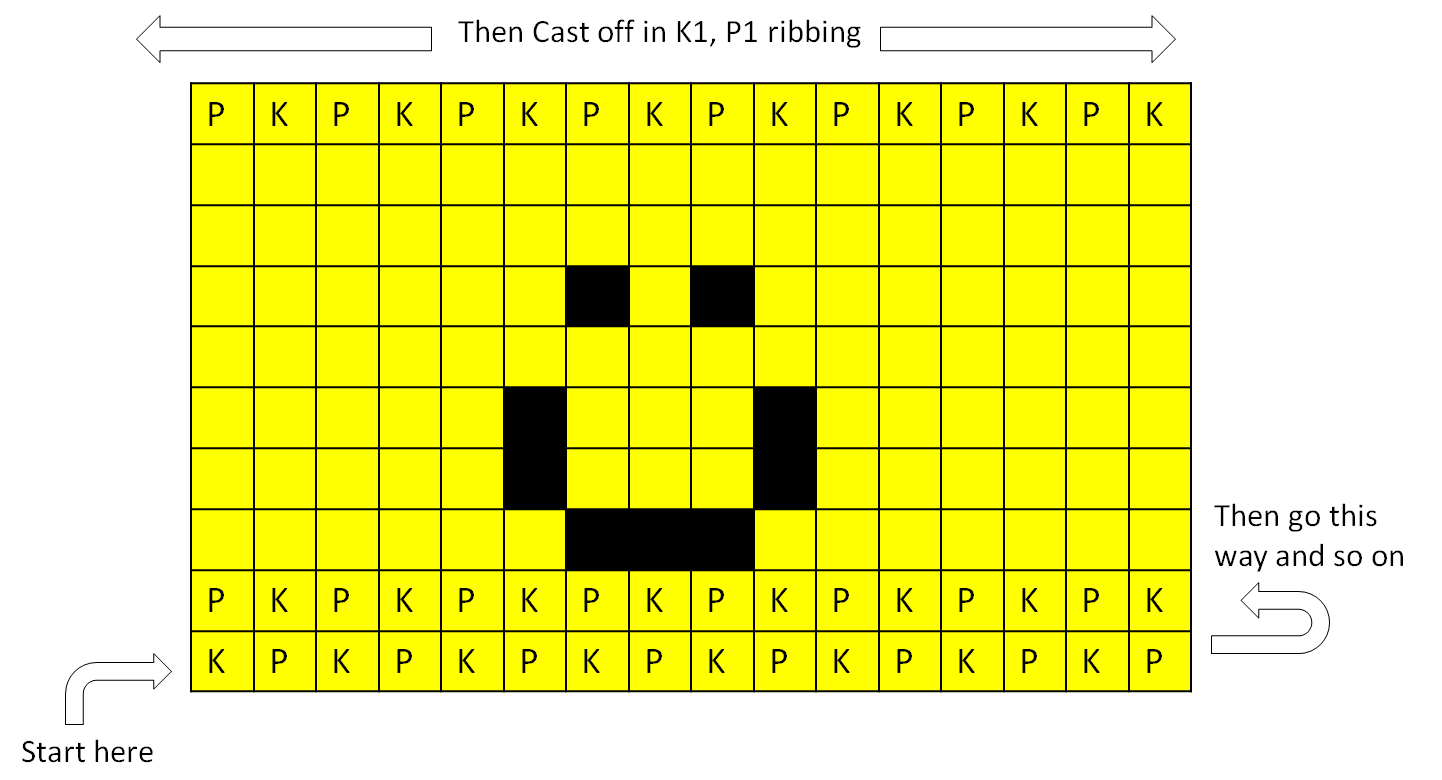
It made me really happy the other day to see that lots of people liked my plaster protector pattern when I posted it up (and didn't think I was crazy :0P) And the other day I came up with two more designs that I thought I would post up too for anyone who wants to make them, a medical cross style one and a smiley face one! :)


All the plaster protectors are made using 3.25mm needles and small amounts of DK yarn. The basic pattern and skull and heart designs for the plaster protectors are all in the first post I did about the plaster protectors here! You can use the basic pattern along with the charts to make them easier to follow :)

Here is the chart for the medical cross style plaster protector:


And here's the one for the smiley face one :-D:


I hope you like these extra designs :)

The other day I actually got a paper cut, from my business textbook! :/ I was sad for about 5 seconds until I realised I finally had the chance to try out my plaster protectors properly :-) I wore the heart one <3 It definitely did make me feel better, I hope they make everyone else feel better too  :)


See you all soon,

Byyyyeeeee xxxxxx

Sunday, 18 September 2011

Plaster protectors - Free pattern! :)

Hey everybody,

Now everything is settling back into routine what with school work and everything I've had time to whip up the pattern for something I came up with the idea for a while ago: A Plaster protector!


Don't worry, I don't have that many boo boos :) Hehhee I'm just modelling them all!
      
If you are a bit confused, don't worry I will explain :) In my house we only ever have the beige/tan boring plasters, never the Hello Kitty, Winne the pooh or character plasters (mainly because they are really expensive and my dad and brother wouldn't want to use HK plasters, lol!) Every time I end up getting a paper cut etc... I try to decorate my plaster with stickers, doodles and all kinds of other stuff but nothing ever works (I'm not crazy I just like pretty stuff!). My plaster also usually ends up getting stuck to my hair whenever adjust my fringe and it and eventually falls off :/

So.... to solve this problem I came up with the plaster protector, a cute little snuggly cozy which you slip on your poor injured finger over your plain, boring plaster to make it look much more fabulous and interesting and stop it from sticking to your hair and clothes! :D

And here is how to make your own so you too can solve all your plaster related problems (If you have any like I do! :-)

You will need:
  • 3.25 mm knitting needles
  • Small amounts of any chosen colour DK yarn
  • A darning needle
  • and a pair of scissors
Basic Pattern:

Using 3.25mm knitting needles and the main colour DK yarn cast on 16sts for medium size: to fit index finger, middle finger, ring finger and thumb. Or cast on 14sts for small size: to fit little finger or smaller childs hand. (To adapt the pattern to fit larger or very small hands just takeaway or add one or two sts to either end accordingly and work as normal.)

Row 1-2: *K1, P1* repeat across
Row 3-9: Stst (begin with a k row)
Row 10: *K1, P1* repeat across

Then Cast off in K1, P1 ribbing (cast off in pattern) and fasten off.

Charts for designs:

The basic pattern makes a single colour plaster protector but you can get as creative as you want and decorate them with whatever you like! :) For example by doing rows in alternating colours you can make a stripy one :0) Below I have included the charts for how to make the heart one and the skull one shown in the picture. (Use the basic pattern along with the charts to get your chosen design :)

Heart chart:


Skull chart:


Making up:

Sew up seam at back of plaster protector to create ring which you can slide over your finger, then darn in any loose ends.
All done! :D

I hope you like my little pattern ! :D

See you all soon,

Bye :)
xxx

Abbreviations:
  • st(s) = Stitch(es)
  • K = Knit
  • P = Purl
  • Stst = stocking stitch (K 1 row, P 1 row)
  • ** = repeat what is in stars across row

Sunday, 24 July 2011

Takochu! (+ free knitted Takochu pattern)

Hi,

Aren't these just amazingly cute! *o*


They are mini octopus toys called Takochu (made by Pine), they even stack on top of each other! I first found out about these on Berrysprite, she has posted about them on her blog a few times and since I saw them I have been kind of hooked :)

They are quite difficult to get hold of though as they are veeeerrrrrrryyyyyy expensive usually and the only place you can really get them for a good price is Kawaii Shop Japan, problem is they sell out very quickly! And then you have to wait for them to restock. I think they have some in stock now though so get down there quickly if you want to get your hands on some like I do! Im ordering some in a couple of weeks :)

Berrysprite put up a free crochet pattern so that people can crochet their own Takochu: http://berrysprite.blogspot.com/2010/07/amigurumi-small-takochu-tutorial.html

I thought the pattern was great when I found out about it but then I got thinking,what about those who can't get hold of the real thing or crochet? 

So I sat down a wrote a pattern for a knitted Takochu style octopus!!! :0) And I'm putting it up for free so there is no one who now can't have a Takochu if they so want one!

Here is the Knit style Takochu octopus:


(hhehehhe, in the background is my fish Razor :) He loves his new friend!!!)

And here is how to make one!:

You will need:
  • Small amounts of DK yarn In any two colours you wish (1 colour for body and tentacles and 1 for the Takochu's mouth)
  • A pair of 3.25mm needles
  • A small amount of stuffing
  • A darning needle
  • A small length of black yarn for embroidering eyes or beads/toy safety eyes
  • And a pair or scissors
Head/Body (make 1):

Cast on 6sts in main colour (6sts)
Row 1: Kfb into each st (12sts)
Row 2: P across row
Row 3: *K1, Kfb* repeat from * to * across (18sts)
Row 4: P across row
Row 5: *K2, Kfb* repeat from * to * across (24sts)
Row 6: P across row
Row 7: *K3, Kfb* repeat form * to * across (30sts)
Row 8: P across row
Row 9: *K4, Kfb* repeat from * to * across (36sts)
Row 10: P across row
Row 11: *K4, k2tog* repeat from * to * across (30sts)
Row 12: P across row
Row 13: *K3, K2tog* repeat from * to * across (24sts)
Row 14: P across row
Row 15: *K2, K2tog* repeat from * to * across (18sts)
Row 16: P across row
Row 17: *K1, K2tog* repeat form * to * across (12sts)
Row 18: P across row
Row 19: K2tog 6 times (6sts)

Thread yarn through remaining stitches, draw up and fasten off.

Tentacles:

To make the tentacles you have to knit four separate tentacle parts (leaving each piece when finished on the same needle) then knit across all four tentacles to join them together:

Tentacle pieces (make 4) (cast on to same needle each time so all four pieces end up on same needle when done):

Cast on 5sts using main colour
Row 1: K across row
Row 2: P across row
Row 3: Kfb, k3, Kfb (7sts)
Row 4: P across row
Row 5: K across row
Row 6: P across row
Leave sts on needle and make next one

Once you have completed all four tentacle pieces work the following rows across all of them:

Row 7: K2tog across (14sts)
Row 8: P2tog across (7sts)

Thread yarn through remaining sts, draw up and fasten off. (You should have something resembling a flower)

Mouth (Make 1):

Cast on 14sts using 2nd colour
Cast off in K


Making up:

Take the head/body piece, carefully sew down the seam (with right side facing inwards) stopping before reaching the bottom. Turn the piece, Stuff then continue seaming. When you reach the cast one edge/bottom (which will actually be the top of the head) thread yarn through 6 cast on sts and draw up to seal in stuffing and create a sphere shape.

Darn in any loose ends on the tentacles and sew the centre of the flower shape (tentacle piece) to the centre of the bottom of the sphere. making sure the right side of the tentacles in facing upwards.

Then take the mouth piece and oversew one end to another to create a small circle. Sew this to the front of the Takochu. Embroider on some eyes using black yarn etc... (use picture as a guide). Finally you can curl up your Takochu's tentacles a bit and shape your Takochu as you want and add any other decorations then you are finished! (you can also spray your Takochu with hairspray if you wish then leave to dry to hold all the tentacles in place or you can just leave it)

Woo hoo!

Once you've made one I guarantee you won't be able to stop :0)


I couldn't!

I hope you like the pattern :) See you soon,

Byeeeee xxx

Abbreviations:

st(s) = Stitch(es)
Kfb = Knit into the front and back of the stitch (a type of increase)
K = Knit
P = Purl
K2tog = Knit two stitches together
P2tog = Purl two stitches together

(P.s Please don't sell items from this pattern without letting me know or linking to my blog first, thanks :)

Friday, 1 July 2011

Crochet crisp packet coaster tutorial!

Bonjour :)

I hope you all saved up some food wrappers and cardboard like I said, as today I thought I would post a tutorial on how to make a crochet crisp packet coaster!!!! You can use any food wrapper, I just first made one with a crisp packet :)


They are pretty much recycled and are quick to make and I think they look great. They come in very handy at parties as everyone can choose one, (their favourite food!!!) and there is no more problem of mixed up drinks! Make them now ready for your summer party/barbecue, you can never have to many coasters...

You will need:

  • Some cardboard e.g from old cereal boxes or birthday/Christmas etc... cards
  • Some food wrappers (about crisp packet size)
  • A pen
  • Glue
  • Scissors
  • Ruler
  • Hole punch
  • 3.75mm crochet hook
  • Small amounts of any DK yarn of your choice (e.g chosen to match your wrapper)
  • Darning needle
How to make them:

Firstly take your cardboard, measure and cut out a 10cm by 10cm square. It doesn't matter what is on either side of the square as you won't see this when your coaster is finished.


Next take your chosen wrapper and place the cardboard square on top of the area of your wrapper you want to be shown on your coaster. Draw around the square.


Then remove the cardboard and place it to one side and cut out the shape from the wrapper, make sure you cut through both sides so you end up with two squares (one from the front of the wrapper and one from the back), both the same size as the cardboard.


Now glue one piece from the wrapper to one side of the cardboard square and the other to the other side. (You can use any glue just make sure it dries before continuing with the next step).


Now this is the tricky bit :/ Take your hole punch and punch 9 holes along each side of your square. (Corners are shared so there are 32 holes in total, see picture if confused)
I recommend you practice on a 10cm x 10cm piece of paper before trying it on your coaster.


After you have done that care fully snip off a little bit of each corner. This makes the corners easier to crochet around and gives them a more rounded finish :)
(It also stops the corners sticking out of your finished coaster!)


Next take your yarn and crochet hook and join the yarn to one of the holes (do this however you normally join on yarn). Do 2dc into each side hole and 4dc into each corner hole. When you get to where you started join with a slst and fasten off.


Finally darn in any loose ends and voila! you have your finished crisp packet coaster :D


The back even looks good too... :0)


Heeehehhee a coaster that gives you nutritional information too, that's impressive!

Abbreviations:
(I am using UK crochet abbreviations)
  • dc = Double crochet
  • slst = Slip stitch
I hope you like the tutorial, you could even make one as a gift using a wrapper from someones favourite food :)

See you all again sooooooonnn

Bye xxxxx :D

(P.S. please don't sell items made from this tutorial, if you want to for charity or another reason please contact me first, thanks xxx)