
Hello everyone,
Today I bring you the new tutorial I made- Pop tab friendship bracelets:

A while ago my crisp packet coaster tutorial was mentioned on another blog and in the same post was a tutorial for a flower decoration made out of pop tabs- the ring pull bits of soda cans (links coming soon I just can't get them to work at the moment). I hadn't thought of using these for crafting before and it made me want to experiment with them. I collected up a few and after some playing around came up with the idea for the friendship bracelets above :-)
Here is how to make some if you would like to make some :P
You will need:

> DK yarn in any colours you want
> A 4mm crochet hook
> 9 pop tabs :)
How to make:
1. Join your first choice of yarn to your first pop tab and 4dc into the top of the pop tab.

2. Take the next pop tab, attach it by crocheting 4dc into the top, like for the first tab but turn the second tab the other way round as in the picture below. (This creates an interesting design in the final bracelet if you crochet one tab round one way then the next the other way :)
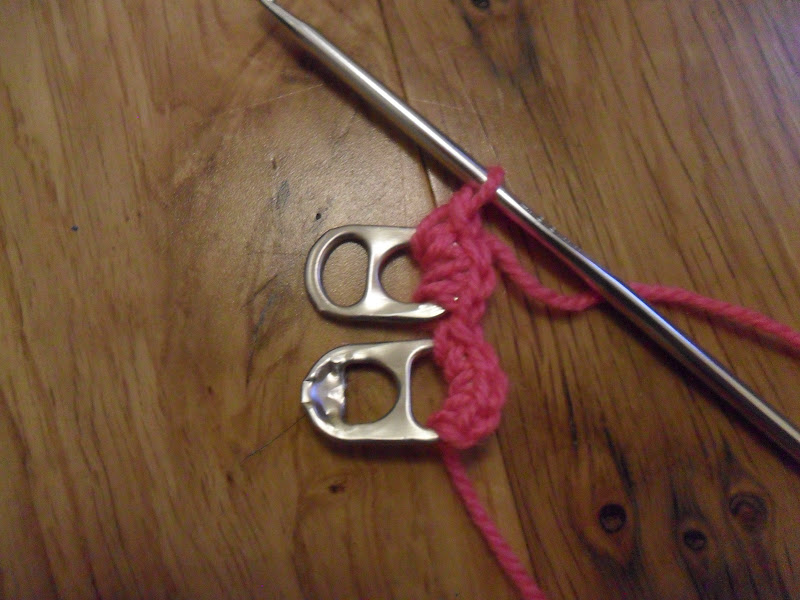
3. Continue along doing 4dc into each stitch until all 9 pop tabs are joined then slip stitch into the top of the last tab to fasten.

4. Turn and repeat down the other side with your second colour yarn.

5. Darn in all loose ends

6. Then cut two lengths of each colour yarn around 25cm long each.

7. Join one set to the end of the bracelet in the following way:


8. Then repeat for the other set at the other end of the bracelet (these are the ties so you can tie it round your wrist :) and Voila, you are all done! Make sure there are no sharp ends of the tabs poking through at all before you wear it though, just for safety!

You can have fun and make them in all different colours for all your BFFs, lol :D
I hope you like the tutorial! :)
See you all soon,
Byyyyeeeeee xxx
Ohhhhh, I want one of these! I wish I could crochet!
ReplyDeletewow so cute..
ReplyDeletethank you for the tutorial..
hugs x
My best friend is learning to crochet, might make her make these :P
ReplyDeleteHello dear I received your blogoversary gift and everything is so lovely..thank you
ReplyDeleteI sent you a e mail too..
Keep well xxx
Alyssa: Hehehe, I'm sure one day you will be able too :)xxx
ReplyDeletecucki: I'm glad you like them :D Thanks for leltting me know about the parcel arriving, i'm glad it got there safely! xxx
springgmusician: Hahaha, what are friends for, lol! :P xxx
very cute idea.
ReplyDeletevery good directions also.
Thank you! :) I try to be clear so I'm glad it was :-)
Delete